THE STIGMA FIELD GUIDE
From image
to impression.
Place, layer and wrap your marks. Shape their color and finish, then choose how to bake them.
Published release: See release notes. This guide covers the released workflows. Requires Blender 4.2.23 or newer.
Development build: 1.0.45.
Getting started
Stigma is available on Superhive and Gumroad. Start with the released package and use the release notes to check which changes your installed version includes. Open the 3D Viewport sidebar with N and choose the Stigma tab. Work in Object Mode with Material Preview or Rendered shading to see your marks.
Install the supplied ZIP using Blender’s Install from Disk action in Preferences, then enable Stigma. Remove an older Stigma installation before switching installation formats; do not enable two copies together. Keep the supplied archive intact. Updating Stigma preserves your saved groups, layers and placements; keep your personal texture-library configuration when moving to another Blender version.
You need a local, editable mesh with a compatible material: a Principled BSDF connected directly to Material Output. Image textures and other artistic nodes feeding that shader can stay in place. See compatibility and limits before using a complex shader.
Place your first decal
- Select the mesh objects that should receive the projection. Place the 3D cursor near the intended surface.
- Click Create Stigma. Stigma creates a group, a layer with its default transparent image and a placement. Selected meshes become explicit receivers.
- With the placement selected and its handles visible, click Change Texture and choose a library thumbnail.
- Use G / R / S to move, rotate and scale. Drag the central projection arrow onto a surface, or hold Ctrl while moving to project and align it.
- Adjust Depth or the volume’s depth handles so the projection reaches the intended surface.
Start directly from the library: use F3 → Change Texture, then drag a thumbnail onto a compatible mesh. If the mesh already belongs to the active group, the drop adds a layer there. Otherwise it creates a new manual group for that mesh. One Undo removes the drop.
Already baked the receiver? You can still use Create Stigma, including after duplicating that receiver. See how to continue after a UV bake.
Use an external PNG: drop one file onto a visible mesh and choose Drop PNG as Stigma if Blender offers an importer menu. Stigma remembers the original drop point and preserves the image’s proportions. This places a decal; dropping files into a personal texture folder imports them into the library instead.
Place, resize and mirror
Each placement is controlled by an Empty and a bounded projection volume. Select it from Placements or click an outline edge in the viewport. The row selects it without moving the view; use Blender’s Frame Selected / Numpad . to find it.
G / R / S use Blender’s transform workflow, including R R for trackball rotation. While moving, Ctrl Face Project aligns the decal to the surface under the cursor with locally smoothed orientation. The central projection arrow does this without holding Ctrl. Enter or left-click confirms; Esc or right-click cancels.
For animated placements or when Auto Keying is enabled, movement uses Blender’s native transform workflow. Static placements keep the surface-projection move controls.
In Plane, drag a face handle to resize while keeping the opposite face fixed. Pass through that opposite face to mirror the image. The central arrow and handles remain a consistent screen size as you zoom. An axis viewed almost end-on hides its resize handles until you orbit to a clearer angle.
Viewport Bounds, Handles and Blender’s Show Gizmos control the editing overlay without hiding the projected image. The eye beside Groups shows other enabled groups’ outlines; the wire-sphere control highlights the active group’s receivers. Outline colors and widths live in Stigma’s preferences.
Cylindrical projection
Choose Cylinder in the selected placement’s Plane / Cylinder selector to wrap an image around an axis. Each placement keeps its own mode and dimensions; image, color and finish remain shared by its layer. Switching back to Plane restores the previous box.
- Choose the group’s receiving meshes explicitly. Use Axis at 3D Cursor to set the cylinder’s position and align its longitudinal axis to world X, Y or Z. Confirming replaces the placement transform; cancel leaves it alone.
- Set Radius and Height, or use the viewport handles. Move and rotate with G / R. Scale the radial axes together to retain a circular cross-section.
- Set Sector Start and Sector Angle, up to 360°. Inner Radius limits reception to an outer band.
- Position the artwork with Image Start, Image Scale, Image Height and Image Z Offset. The image origin is independent of the receiving sector. Keep Image Aspect uses the arc length at the reference radius.
- Soften boundaries with Angular Fade, Height Fade and Radial Fade. Cap Fade reduces coverage on end-facing surfaces; Facing filters against the outward radial direction.
Fit a tapered tube
Enable Tapered Tube for different Start Radius (−Z) and End Radius (+Z). Reference Radius scales both ends proportionally, including when using the four diameter handles at mid-height. Keep Pattern Size compensates pattern width and length along the taper. Inspect the fit and full-turn seam: one linear taper cannot match every change in an anatomical surface.
Repeat around and along the cylinder
Angular Copies and Longitudinal Copies repeat the image on each axis. Clip Angular/Height Envelope limits the image area; disabling a clip continues the pattern within the receiving volume. Use Periodic Image U/V only for source images that tile on the chosen axes. The controls do not make a non-seamless image seamless. Choosing another library texture retains the original image and its dimensions, including when only one axis uses periodic wrapping.

Cylinder applies only to the group’s explicit receivers, including when other objects share their mesh or material. Inspect Cylinder Slots reports intersecting material slots. After editing image pixels without a Blender update, use Refresh Image for the viewport.
Cylinder is a rigid projection in the current pose. It does not follow skin deformation or compute occlusion. Use Bake Stigma UV Layer to make the captured mark follow Armature and shape keys. Shear, unequal radial scale, generated instances and automatic reception are outside this workflow. Auto Settle and Ctrl Face Project are placement aids for Plane.
Facing and surface direction
Enable Facing beside Repeat to attenuate coverage on surfaces whose shaded normals turn away from the projection axis. It is optional, starts disabled and is stored per placement.
Angle sets the maximum angle that still receives full coverage. Softness controls the fade beyond that angle; zero gives a hard cutoff. The fields are inactive while Facing is off. Lower Angle for a tighter projection; adjust Softness to soften its edge.
In Cylinder, Facing uses the outward radial direction. Rotating a placement updates its orientation mask in Eevee and Cycles without rebuilding the materials. Mirroring the depth axis reverses which side counts as facing the projector. The same effective coverage limits color, the Mask output and material finish.
Facing is an orientation filter, not occlusion. Two surfaces facing the projector at different depths can both receive the mark; a nearer object does not block the projection onto a farther one.
Textures and personal folders
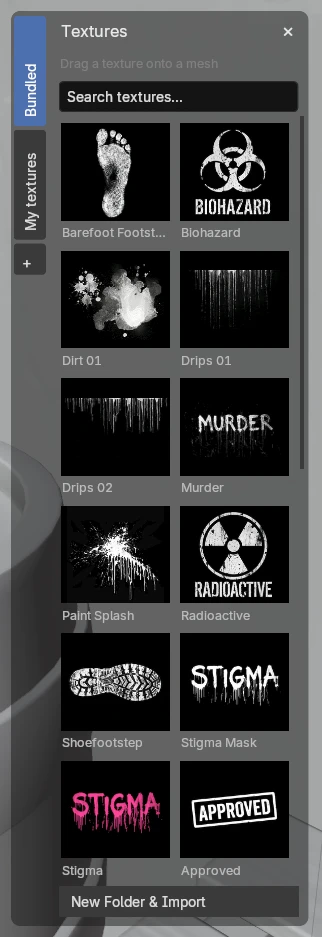
Change Texture opens a floating shelf that follows Blender’s theme. Move it by its header, scroll inside it and search by name. Search is local to the current folder, ignores case and accents, and keeps scene Undo separate from editing search text.
The Bundled tab contains 30 textures, including footprints, drips, dirt, Paint Splash, scratches, rust, moisture, labels, color stickers and four irises (blue-gray, brown, green and violet) with their original color and transparency. Click a texture to replace the selected placement’s layer image. Its handles must be visible; a remembered layer alone is not enough. All placements of that layer share the replacement image.
Changing a non-repeating image fits its proportions while preserving center, orientation, depth, longest side and flips. With Repeat enabled, the bounding volume stays fixed and the tile’s proportions adapt instead.
Remove a personal texture: press Delete over its thumbnail and confirm. Bundled artwork is protected. Scene layers using that texture receive the default image while retaining their placement and artistic settings. Undo can restore scene assignments, but the personal catalog deletion is permanent; source files outside the library are untouched.
Organize your own collection
- + creates a personal folder; double-click a folder tab to rename it.
- Import textures imports one or several files into the active personal folder. From Bundled, New Folder & Import creates a destination first.
- Drag a thumbnail to a personal tab to move it between folders. Dragging from Bundled copies it into your collection and leaves the included pack intact.
- Drop files from your file browser onto a personal folder tab or its open contents. If Blender asks, choose Import into Stigma Folder.
Imported originals and folder metadata live in CONFIG/stigma/textures/, so they survive restarts and add-on updates. When changing Blender’s major version, migrate that configuration too. Folder operations do not participate in scene Undo and do not move or delete your source files. Reimporting an identical image assigns it to the destination without duplicating its stored contents.
The selected library image is packed into the .blend; your full personal library is not. Opaque grayscale imports use Luminance and a dedicated Non-Color image; transparent images keep Alpha. You can change Mask Source afterwards.
Layers, color and overlap
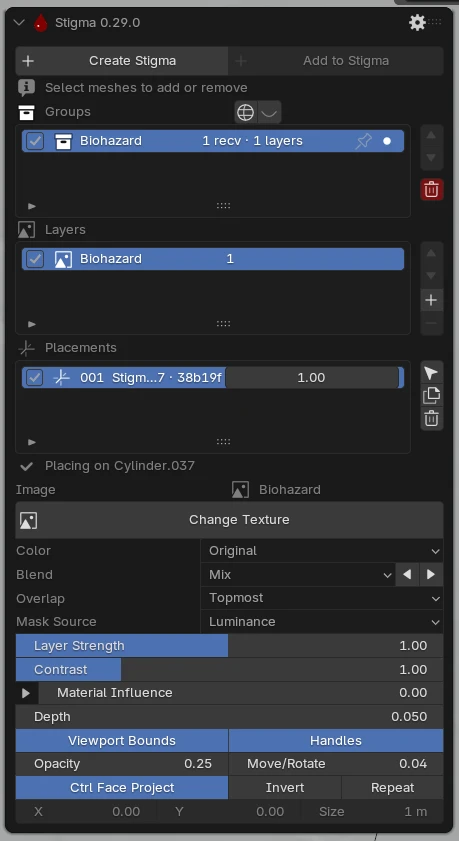
A group shares a stack across its receivers. A layer owns one image and its artistic settings. A placement gives that image a position, orientation and volume. Several placements can use the same layer.
Topmost rows compose on top. Move groups and layers up to raise their priority. New ones appear at the top. Enable checkboxes let you hide a group, layer or placement without losing its settings. Disabled marks and their editing bounds disappear together.
+ beside Layers creates a layer with the default image. For batch import into layers, use F3 → Add Decal Layer and select multiple images. One layer per file is created in alphabetical order, with preserved image proportions and one Undo for the batch; placements initially overlap and can be moved apart.
Color: Original uses the source RGB. Solid Color substitutes your chosen color while preserving the mask. Layer Strength, Contrast and Invert adjust coverage. The 19 Blend modes include Mix, Multiply, Screen and Overlay; the arrows step through modes without reopening the menu.
Overlap: Topmost uses the placement with the strongest mask, which can show a seam at partially transparent edges. Blend composites placements in sequence so marks build up. Color blending is separate from material finish and the maximum coverage Mask output.
Duplicate or tile a texture
Separate placements
With exactly one managed placement selected, use Ctrl+D, Shift+D or Alt+D to duplicate and move it. The image remains shared by the layer, while the new placement has its own transform. Confirm to keep it as one Undo step; cancel to remove the provisional copy.
A repeating pattern inside one placement
In Plane, the Repeat toggle near Invert tiles the image inside the selected projection volume. X and Y offset the pattern in tile units. Size sets the tile’s longest side in scene units and scales both axes uniformly.
Resize the bounding volume to reveal or crop repetitions without stretching the texture. Depth still limits the projection. Each placement stores its own repeat settings and passes them to duplicates. A flipped volume also flips the pattern.
Cylinder uses Angular Copies / Longitudinal Copies instead of Plane’s tiling toggle. Repeat does not make a texture seamless. Use a tileable source when you want invisible joins. Duplicating a placement and tiling its image are two different operations.
Alpha and luminance masks
Alpha uses image transparency and remains the default for saved files. Luminance uses the original image’s brightness before recoloring: white reveals, black hides and gray gives partial coverage. Use it to turn black-and-white images into colored stencils.
In Luminance, Contrast acts around 0.5, followed by Invert. Original alpha, projection bounds, strength and visibility still apply: transparent areas and space outside the volume stay empty even when inverted. Alpha retains its historical inversion of the alpha itself.
Color space affects brightness. Stigma does not change an existing artistic image’s color space when switching this control. Mask Source changes the shader structure; contrast, strength and color adjust existing controls.
Material finish per layer
Material Influence, below Contrast, blends between the original material finish and the layer’s values. It defaults to 0, preserving the previous surface. At 1, fully covered areas use the settings in its expandable section.
| Control | Use it for |
|---|---|
| Metallic | 0 for a non-metallic sticker; 1 for a metallic finish. |
| Roughness | From 0, glossy, to 1, rough. Default: 0.5. |
| Specular | Principled Specular IOR Level. Default: 0.5. Non-metallic stickers can still reflect light. |
Try a sticker on metal: raise Material Influence to 1, leave Metallic at 0 and adjust Roughness. Outside its coverage, the original material maps and values remain in use. A black area of an Alpha sticker still receives the finish.
Finish uses the effective layer mask, including Alpha/Luminance, clipping, strength and visibility. Color Blend modes do not change these channels. Overlapping placements use maximum coverage for finish; layers and groups blend finishes in their composition order.
The controls update shader values without rebuilding on every slider change. Stigma preserves original sources and restores them when the last group is removed. It does not alter Normal, Bump, Coat, IOR or Transmission and does not provide a complete PBR texture set.
Shared groups and receivers
Create Stigma uses explicit, manual membership. Selected meshes become receivers. Select additional meshes and choose Add to Stigma. If every selected mesh is already a member, the action becomes Remove from Stigma; mixed selections add missing members.
Moving or resizing a projection does not add objects to that list. A mesh can belong to several groups, with their list order controlling composition. Stigma Tools → Join Group From Object… shares an existing group instead of copying its layers.
Shared materials need care in Plane: another user of the same material can display the decal within its volume even when it is not an explicit receiver. For strict exclusion, give that object a separate material. Cylinder restricts reception to the group’s explicit meshes without duplicating their materials.
Delete placements with Blender’s native Delete. Stigma removes their records and any layers or groups emptied by that deletion. Undo/Redo restores the projection and its records together. Intentionally empty groups and sources retained by a UV bake are preserved. Hiding a placement is not deletion.
Automatic reception is experimental, hidden and disabled by default. Existing automatic groups retain their confirmed receivers and materials. Automatic scene tracking, generated-receiver discovery and animation preparation are not part of the normal buyer workflow.
Pin placements to an object
The pin beside a group makes its placements follow a receiver. A group with one receiver pins immediately; a shared group asks which receiver to follow. Click the highlighted pin to unpin with one-step Undo. Stigma preserves world placement when the transform can be represented without its anchor. If parent scaling introduces shear that cannot be preserved, it explains the conflict and leaves the group unchanged.
One anchor serves the whole group. For an external object such as an Empty, use Stigma Tools → Choose Anchor…. Changing anchors preserves the placements’ world transforms, including shear. The anchor moves placements; arrange the receiver objects’ movement separately if the whole assembly should travel together.
Preview Auto Settle
Choose Stigma Tools → Preview Auto Settle or find it with F3 in the viewport. It samples the chosen support surfaces at three or four points and proposes a placement orientation and volume. Inspect its rays and preview, then confirm with one Undo or cancel without moving it.
Sampling mode, distance and plane tolerances live in Stigma’s add-on preferences. It is an explicit placement aid, not continuous surface tracking or a geometry-wrapping modifier.
Use coverage in your shader
Stigma Compositor → Mask exposes maximum effective coverage across placements, layers and groups. Alpha/Luminance, clipping, inversion, strength and visibility affect it. Disabled elements and positions outside the volumes contribute zero.
Connect it manually to emission or your own mixing nodes. Material Influence already handles the built-in Metallic, Roughness and Specular workflow, but Mask remains available for custom connections.
Coverage does not accumulate with Overlap: Blend and does not change with color or layer order. Connections survive rebuilds and group removal; after the last group is removed, existing consumers remain connected to a zero Value node. Older shader graphs gain the socket on an explicit rebuild.
Included artwork and starter files
The current 30-texture library is available directly from Change Texture. Bundled artwork permits personal and commercial projects, including client work, without attribution; redistribution as a standalone texture library is excluded. Read assets/textures/LICENSE.txt in the supplied package. Your imports retain their own licenses.
A separate development prototype under assets/starter/ contains 20 transparent PNG decals, editable SVG originals, a contact sheet and a portable sample.blend with packed images. These prototype files are separate from the 30-texture shelf.
Stigma’s code is licensed under GPL-3.0-or-later; artwork has its own terms. Read the starter folder’s LICENSE.txt before redistributing any of those files.
Watch the demo
Playing with STIGMA | Easy Decals for Blender ↗
The Outlier Labs demo opens on YouTube. The landing links to the same video.
A previous 76-second development recording also remains available. It uses scripted Blender operations and an earlier interface, so use this guide for current control names.
Bake to Texture
Select the receiving mesh in Object Mode, then open the gear menu in the Stigma panel. Choose the result you need:
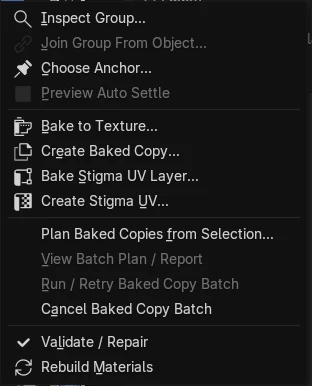
| Stigma Tools | Result |
|---|---|
| Bake to Texture… | New images of the complete material, including applied Stigmas. The receiver and materials remain editable. |
| Bake Stigma UV Layer… | A UV contribution on the receiver, with the base material live and editable projection sources retained. |
| Create Baked Copy… | An independent static mesh with its own materials and packed maps, retaining the original. |
- Prepare a named destination UV with unique, non-overlapping islands. Zero-area UV triangles are skipped with a warning; a mesh with no valid UV area needs a new unwrap. Use Create Stigma UV… when you need to preserve the base texture’s mapping.
- Open Bake to Texture… and choose Complete material channels. Select Base Color, Metallic, Roughness, Specular IOR Level and/or Stigma Coverage.
- Choose the destination UV, 1K / 2K / 4K resolution and margin. The default at 2K is 16 px; leave enough separation between unrelated islands.
- Pack the images into the .blend or write new external PNG 16-bit / EXR 32-bit files. Use a fresh output prefix. EXR preserves linear HDR and negative values; PNG is for values in 0–1.
- Review the material and UV checks, then run the capture. Esc cancels. The chosen channel set is delivered together; save the .blend to retain packed results.
Base Color PNG is sRGB; scalar data maps are Non-Color. Specular IOR Level is Blender’s parameter, so check its interpretation in another application. Stigma Coverage is maximum effective coverage, separate from Alpha, and is not connected to material opacity automatically.
Bake to Texture creates maps; it does not replace the original material. Completed external files remain after Undo. Regular capture covers color, scalar finish and coverage. Final-normal capture is experimental and disabled by default; Height and displacement are not bake outputs. Capture runs in a separate Blender process on the CPU. Check resolution and memory before capturing a large scene; a 4K capture can need more than 4 GiB in addition to the scene.
Bake a Stigma UV layer
Use this workflow for a tattoo that should follow skin deformation, or to consolidate a block of marks while keeping the underlying material live. The captured UV layer still needs Stigma; use Create Baked Copy for an independent result.
- Place the marks in the pose you want to capture. Sources must use Mix; placement overlap can be Topmost or Blend. Color, masks, Facing and partial material finish are included.
- Select the receiving mesh. If its existing UVs overlap or mirror, choose Stigma Tools → Create Stigma UV…. Review the new unwrap in the UV Editor; base UVs and their render mapping stay intact. For a shared mesh, explicitly choose Make mesh local first.
- Choose Bake Stigma UV Layer…. Capture the active complete layer, active group, a contiguous range or all receiver sources. Choose UV, resolution and margin. Sources must form a contiguous block in each material.
- Save the .blend with the packed result. The UV baked layer follows Armature and shape keys with stable UVs and topology. Moving the original projector no longer moves the baked mark.
- Use Edit sources to return to projection, then select the receiver and choose Update bake after changes. Restore projection retains the maps; Delete result restores the sources and removes unused resources owned by that result.
One UV block is supported per receiver. Other layers and receivers stay live, as do the base material’s textures and artistic normal connections. An update captures the current pose from the retained sources; cancelling or failing preserves the previous result.
This deformation workflow supports Armature and shape keys with matching viewport/render evaluation. Changing topology or destination UVs requires resolving the mismatch before updating. Non-Mix blends and unsupported modifiers are diagnosed before capture. UV triangles with zero area are skipped with a warning; they receive no pixels. A UV with no valid area must be replaced.
Keep working after a UV bake
Select a baked receiver and use Create Stigma to add a new group. If you duplicated the receiver or it shares its UV-baked materials, Stigma separates those materials as needed while preserving the existing baked images, retained layers and artistic material edits. The previous mark stays in place without another bake.
Duplicate the receiver with its saved bake data. Assigning a UV-baked material manually to an unrelated object does not create a bake relationship; use its original material and create or bake a Stigma on that object instead. UV, topology and material-slot checks still apply.
Preserve material edits when restoring
Restore projection and Delete result check for artistic changes before replacing a UV-baked material. This includes ColorRamp and curve edits and RGB/Value outputs, including older saved results. If those edits would be lost, the operation stops so you can preserve them first. If you changed the original base material while editing sources, resolve the outdated result before updating it.
Create an independent copy
Select the receiver and choose Stigma Tools → Create Baked Copy…. Set the destination UV, resolution, margin and a new copy name. The result appears beside the original with its own mesh, materials and five packed EXR maps: Base Color, Metallic, Roughness, Specular IOR Level and Stigma Coverage.
The original stays editable. Save the .blend to retain the output; the copy opens without Stigma. Undo reverses delivery and Esc cancels without leaving an incomplete copy.
A copy can capture the current pose from Armature and shape keys, plus supported Bend/Twist, Triangulate and Subdivision evaluation. It is a static snapshot: the rig, animation and shape keys do not travel with it.
Independent copies use a supported opaque Principled material profile. Unsupported effects, variable emission, linked normal/bump effects and generated instances are diagnosed before capture. Match viewport/render evaluation and inspect the output in your target application. Dedicated game-engine export adapters are not provided.
Plan and run baked copies
- Select the editable mesh receivers and choose Stigma Tools → Plan Baked Copies from Selection…. Set a new prefix, resolution and memory budget. Leave UV blank to use each receiver’s active UV, or name a UV that exists on every receiver.
- Review object count, destinations and estimated memory. Open View Batch Plan / Report for the full saved plan.
- Choose Run / Retry Baked Copy Batch. Receivers run sequentially and completed copies appear beside the source objects.
- Esc or Cancel Baked Copy Batch stops the current unit; completed independent copies remain. Inspect Complete, Failed and Pending entries, then retry unfinished units.
Save the .blend to keep the report. Retry validates the saved source state; changes to artwork, UVs, materials, pose or frame require a new plan. This includes ColorRamp, curve and RGB/Value node edits, so a batch does not silently use an outdated material. Estimated memory is a planning aid, not a hard operating-system limit.
UV layouts, atlases and UDIM
Choose an output layout
In the batch plan, Output UV can keep source UVs, Repack existing islands or use Smart unwrap. New layouts are created only on output copies; the originals stay intact. Review automatic seams, padding and relative texel density.
Share one atlas lets copies share the five output maps while keeping objects and material slots separate. Atlas delivery is all-or-nothing: cancellation or failure leaves no partial atlas.
Use prepared UDIM tiles
Enable UDIM destination in texture, UV-layer or copy capture. Prepare unique destination UVs within tiles 1001–2000, with each face entirely inside one tile. Stigma captures the occupied tiles at one common resolution; it does not split faces or invent tiles for gaps.
Batch UDIM uses Keep source UV; sharing an atlas requires non-overlapping destination UVs across all receivers. Repack and Smart unwrap create 0–1 layouts rather than distributing islands across tiles.
Pack the complete tile set, or use Complete material channels for new external files named by channel and tile with a JSON channel index. A failed or cancelled later tile preserves the previous result.
UDIM destinations do not enable arbitrary UDIM source shaders. Padding and mipmap behavior need review for your intended viewer or engine. No automatic export conversion is implied by a Blender bake.
Keep the scene responsive
Shader cost depends on placements, layers, shared materials, scene complexity and hardware. The panel warns at 25 placements per layer and 50 layers; these are advisory thresholds, not hard limits or performance guarantees. Eight groups sharing a material are the project’s measured range for interactive editing.
Moving placements and editing color, finish or repeat values update existing controls. Structural operations, such as adding layers or switching mask sources, can require node rebuilding and shader compilation.
In Eevee and Material Preview, some texture, blend and duplication edits briefly retain the previous viewport image while shaders compile. Navigation or another interaction releases that image. This improves visual continuity; it does not eliminate compilation time or accelerate Cycles.
Compatibility and limits
- Minimum Blender: 4.2.23. The current release package and selected regressions were checked on Linux with 4.2.23, 4.5.14 and a local 5.2.0 build. The creator tested Windows for the 1.0 launch; that does not establish a Windows test matrix for later releases. macOS remains unverified. External PNG dragging was tested on Linux/X11; that gesture has no formal Windows, macOS or native Wayland validation.
- Eevee and Cycles. Stigma projects into Base Color and optionally blends scalar Metallic, Roughness and Specular values of a compatible Principled material.
- Local, editable data. Linked objects/materials, Library Overrides and arbitrary shader layouts are outside the supported workflow.
- Bounded projection, no occlusion. Plane clips in a box; Cylinder clips by height, radius and angular sector. Nearer geometry does not hide farther geometry. Facing filters orientation, radially in Cylinder. Check bounds and receiver membership; shared material users need care in Plane.
- Preserve custom nodes. Keep artistic work in the main material tree, outside Stigma’s generated node groups.
- Texture and UV baking. Capture supported channels, deforming Stigma UV layers or independent static copies, including batches, atlases and prepared UDIM destinations. Each workflow validates UVs, geometry and materials before capture. Dedicated engine exporters are not supplied.
- Available now. Stigma is sold on Superhive and Gumroad. Check the published release notes and your installed version when following this guide.
Inspect and recover
Open the gear in the panel header for Stigma Tools. Inspect Group… combines Objects, Materials and Issues, with receiver selection and on-demand shared-material inspection.
Validate / Repair diagnoses the active group and repairs unambiguous inconsistencies. Missing images, objects or ambiguous memberships may need your decision. Rebuild Materials regenerates managed shader groups; move custom nodes out of those groups first.
Older 0.9.0 data requires explicit Migrate Data. Save a copy before migration. For published release notes, see the changelog.